


How to Remove Floor and Wall Tiles Without Breaking Them
How to Remove Floor and Wall Tiles Without Breaking Them
Been dreaming of finally renovating your kitchen or bathroom? There’s no better time than now to roll up your sleeves and get started. Whether the project’s been on your mind since the pandemic days or it’s a fresh goal for this year, changing your floor and wall tiles is one of the simplest ways to give your space an entirely new vibe.
But if you’re hoping to reuse some of your old tiles down the line (or keep a few for future repairs), you’ll want to remove them carefully — without cracking or chipping them. Here’s how to do just that.
🔍 Start With Realistic Expectations
Let’s be honest: not every tile will come out perfectly intact. The very first tile is always the hardest because there’s usually no easy way to pry it up from the side. You’ll likely have to nudge around with the back of a hammer or a similar tool to loosen it — and it may break.
Don’t stress if this happens. Sacrificing one tile to free up the rest is often just part of the process.
🧘 Patience & Discipline Are Key
Removing wall or floor tiles can be tedious and time-consuming, and some problems only show up once you’re deep into the job. The construction underneath, the type and quality of your tiles, and even how snugly they’re laid will all play a role.
Some areas might have been tricky to tile in the first place — they’ll be just as tricky to un-tile. Take your time, work carefully, and stay patient. Trust us, slow and steady wins this race.
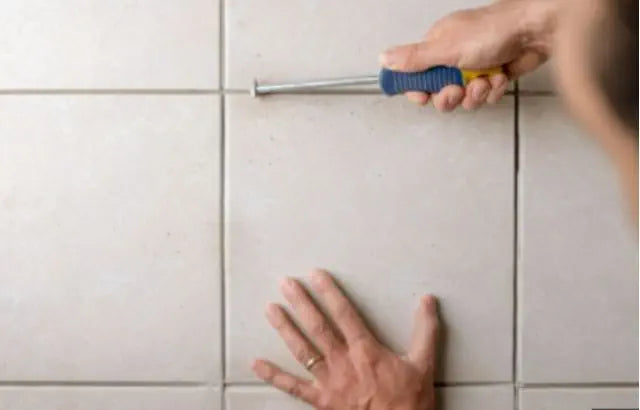
🛠 How to Begin Removing Tiles
1️⃣ Start at the edges of your floor or wall where you’ll have more wiggle room.
2️⃣ Wear safety goggles — chips can fly up when you least expect it.
3️⃣ Use the back of your hammer or a similar tool to gently test corners until you find a slightly loose tile.
4️⃣ Ease it out slowly. Once it lifts, you’ll have better access to the tiles around it.
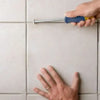
➡️ Move Methodically Across Your Space
With a tile or two freed up, you can start chiseling or scraping from the open edges. Keep an eye on the orientation of your scraper or chisel — using it the right way speeds things up and lowers the risk of cracking tiles.
You’ll probably find a mix of situations:
-
Some tiles pop off easily, especially if a flexible adhesive was used.
-
Others might be glued down with rock-hard mortar, making them nearly impossible to remove cleanly.
If you hit a tough spot, take a break or move to a different tile. You can always come back to the stubborn ones later.
💡 Need Extra Help With Your Reno?
At Bella Bathrooms, we’re all about helping you get the most out of your renovation — whether it’s picking out gorgeous new tiles, offering tips on how to remove floor tiles without breaking them, or simply cheering you on through the process.
If you’ve got questions or need personalized advice, reach out to us anytime. We’ll help make sure your dream kitchen or bathroom comes to life — and looks flawless down to the very last tile.